A Review of the DIY Elective at DHS
My time taking DIY was a confusing, yet surprising, blast.
Upon taking the DIY elective at DHS, I figured it would just be something to help me get STEM credits. Who would’ve known I’d be explaining to my dad where the air filter is in the hood of our car? I would’ve never figured I’d be having fun helping my dad wire outlets and figure out why a light won’t turn on in our home. I even know why the water gets cold so quickly in the shower after my sister showers, an annoyance we’ve all been dying to get rid of.

I took DIY in the first semester of my sophomore year. When my guidance counselor explained that they thought DIY would be a fun choice since they’d seen kids working with pretend toilets, I expected a cardboard toilet with pipe cleaners acting as tubes. Now I know why people are surprised to see an entire car lifted in the air when they enter our room, along with a collection of real toilets, sinks, sheetrock pieces, pipes, and tools!
DIY consists of four units: Automotive (working with cars), plumbing, sheetrock, and electrical. In each unit, you learn about common problems you’ll approach in your home following those topics. You also learn about how to approach those problems and the necessary tools you’ll need for them. DIY also grades you based on how well you learn and apply your knowledge within each unit concerning 1-2 mini projects you had to complete per unit. For example, one of our plumbing tasks was connecting two copper pipes and a PEX pipe (a plastic pipe). Our grade was based on how well it was done. Our “tests” were videos we made with other people to show how to approach specific tasks we learned about in each unit.
In the automotive unit, we learned about cars, their parts, and how they work. We lifted a car using a jack stand, completed an oil change, changed, rotated, added air to tires, replaced an air filter, checked fluids, jump-started a car, and more. I admit I wasn’t too fond of this unit because some parts were so complex. Changing motors is a process that can take 30-45 minutes to do if you’re new to automotive repair, and because of all the tools and parts you need, it’s exhausting. That time and effort are what I was tired of by the time the unit finished. On the bright side, despite some annoying processes, I can show off my knowledge of cars with my dad now with confidence.
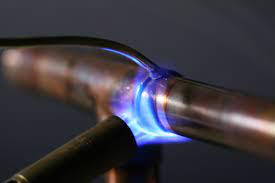
The plumbing unit was one of my personal favorites. We learned about the types of pipes, specialized tools for plumbing, and how to approach common plumbing issues at home. We started by learning how to solder copper pipes, which means you’re connecting copper pipes using propane gas and a metal that acts as the seal of the connection. We were literally playing with fire by heating a copper pipe and then using the metal to solder the pipes together. Later in the unit, we learned how to tackle common plumbing problems at home. We learned how to retrieve a lost item down the drain, plunge a toilet, replace faucets, replace a toilet seat, and much more. Now I know how to get my ring if I accidentally lose it in the sink.
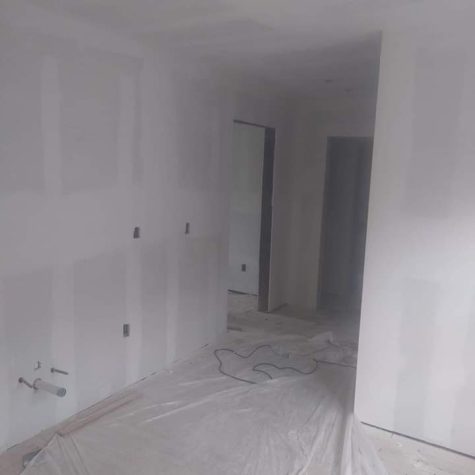
The sheetrock unit was the easiest and most enjoyable unit for me. Sheetrock or drywall is the paneling of a home, pretty much the walls of it. We were also taught how to fix holes of various sizes in walls and cover screws. I had so much fun working with plaster during the unit. Plaster’s a material like cream, and you use a taping knife for it. It was oddly satisfying spreading the plaster onto the drywall and just seeing the holes go away in a snap.
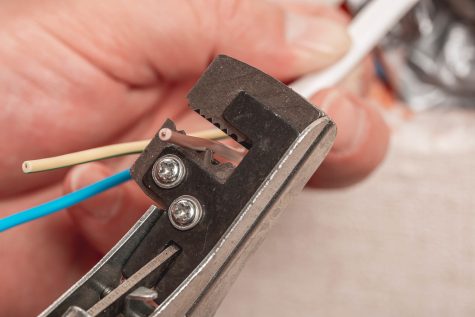
Finally, we studied wiring outlets and how to assemble them in the electrical unit. To wire an outlet, you must acquire and strip the correct types of wire. Then you wrap it around screws, fold the wires together, package it in a blue box, then screw the outlet cover on the top of the blue box. I honestly didn’t mind this unit, but I was only annoyed about the time it took. This process can quickly be completed within 10 minutes, but since we were learning it, our mini-project took 4-5 classes to complete. Aside from that, we also learned about electrical connections and the importance of your electrical box. Many issues with electricity can be identified using the electrical box, so I’ve kept it in mind if my mom ever asks me about an outlet not working when she’s charging her phone.
Overall, DIY thoroughly covers common problems you may encounter in your home and how to approach them within these four units. I’d say the only flaw of the course is just the speed of it and that it can be annoying to people that are impatient and want to get things done as soon as possible. Some days went by fast, but others went by slowly, depending on the task we had to complete that day.
Honestly, I recommend taking this elective even if you are or aren’t a hands-on person. I’m not a hands-on person, but now I can apply my knowledge to several things I couldn’t have done before. Instead of paying money for someone to come over, your family can rely on you to help fix issues in your home. Even if the course isn’t the most enjoyable for some in the end, what makes it worth it is the content and knowledge you gain from it that you’ll inevitably be using for the rest of your life.

Valentina is a sophomore who started writing for Neirad in 2023. She enjoys writing OpEds, pop culture, and reviews. You can find her scrolling through...